
What is GraphQL?
Unlike the traditional RESTFUL architecture where an endpoint returns a set of data designated by the API whether you want it or not, GraphQL allows you to cherry-pick the exact data you want from what the API provides.
Let's assume you want to access some items in a warehouse, there are two ways to achieve it: METHOD A and METHOD B. For each of the methods, you need the correct Access key to access the items in the warehouse. With METHOD A, you'll get a copy of the entire items in the warehouse and you would need to select what you actually need out of what you already received. With METHOD B, you have the privilege to specify the exact items you need and will only be sent those items, you don't need the entire copy of the warehouse. METHOD A is RESTFUL architecture while METHOD B is graphQL.
Read more about GraphQL on the graphQL website.
In this article, we'll focus on how to build an API using graphQL, Node.js, Sequelize, and PostgreSQL. We will build a simple blog API that has Users, Posts and Comments. A user should be able to authenticate (register, login and create a post, view posts, create comments and view comments.
Table of contents
-
Explanation of terms
- Schemas and Types
- Resolver
- Query and Mutation
- Context
- Setup project and Install Dependencies
- Create Database Migrations and Models using Sequelize
-
Create GraphQL Schema for User, Post, and Comment
- User Schema
- Post Schema
- Comment Schema
-
Create Resolvers
- User Resolver
- Request Authentication
- Post Resolver
- Comment Resolver
- Conclusion
- More Resources
- What next?
Explanation of terms
- Schemas and Types: Schema defines the structure of the data the can be queried while Type defines the format of the data like the data type we already know. Read more about Schemas and Types here
- Resolver: A function on a GraphQL server that's responsible for fetching the data for a single field or the entire schema.
- Query and Mutation: These are special GraphQL Types. Query represents the GET request in REST API while Mutation represents POST, PUT, DELETE requests in REST API. Ream more
- Context: Context is a global object in GraphQL. Data available in context is shared among all resolvers.
Keep those explanations in mind as we get ready to start coding things out.
There are a number of libraries that implement GraphQL, in this article, I'll be using the Apollo GraphQL.
To follow along, clone the repository used in this article here
Setup project and Install Dependencies
- Open your terminal and create a folder for the project.
$ mkdir graphql-node-sequelize && cd graphql-node-sequelize

$ npm init -y- Install dependencies
$ npm install express graphql apollo-server-express bcryptjs core jsonwebtoken pg pg-hstore sequelize dotenv

$ npm install -D nodemon- Setup Server
$ mkdir api graphql

$ cd graphql && mkdir resolvers schemas context
We create a folder for the server called api and another one called graphql for housing resolvers, schemas and context.
Note this structuring is completely my opinion and does not in any way mean a standard, feel free to structure your project the way you like.
- Create root schema
In the schemas folder, create an
index.jsfile and copy the code below into it:
// graphql/schemas/index.js

const { gql } = require('apollo-server-express');

const rootType = gql`
 type Query {
     root: String
 }
 type Mutation {
     root: String
 }

`;

module.exports = [rootType];- Create root resolver
In the resolvers folder, create an
index.jsfile and copy the code below into it:
// graphql/resolvers/index.js

module.exports = [];- Create the context
In the context folder, create an
index.jsfile and copy the code below into it:
// graphql/context/index.js

module.exports = ({ req }) => {
  return {};
};- Create server
In the
apifolder, create aserver.jsfile and copy the code below into it:
// api/server.js

const express = require('express');
const { createServer } = require('http');
const { ApolloServer } = require('apollo-server-express');
const cors = require('cors');
const typeDefs = require('../graphql/schemas');
const resolvers = require('../graphql/resolvers');
const context = require('../graphql/context');
const app = express();

app.use(cors());

const apolloServer = new ApolloServer({
  typeDefs,
  resolvers,
  context,
  introspection: true,
  playground: {
    settings: {
      'schema.polling.enable': false,
    },
  },
});

apolloServer.applyMiddleware({ app, path: '/api' });

const server = createServer(app);

module.exports = server;
Next up, create an index.js file at the root of the project folder and add the code below into it:
// ./index.js

require('dotenv').config();

const server = require('./api/server');

const port = process.env.PORT || 3301;

process.on('uncaughtException', (err) => {
  console.error(`${(new Date()).toUTCString()} uncaughtException:`, err);
  process.exit(0);
});

process.on('unhandledRejection', (err) => {
  console.error(`${(new Date()).toUTCString()} unhandledRejection:`, err);
});


server.listen({ port }, () => console.log(
  `🚀 Server ready at http://localhost:${port}/api`,
));
Let's add start scripts to the package.json
...
"scripts": {
    "dev": "nodemon index.js",
    "start": "node index.js"
  },
...
Now, we are set to start the server
$ nm run dev

🚀 Server ready at http://localhost:3301/api
When you visit http://localhost:3301/api you'd see the playground as shown by the screenshot below:
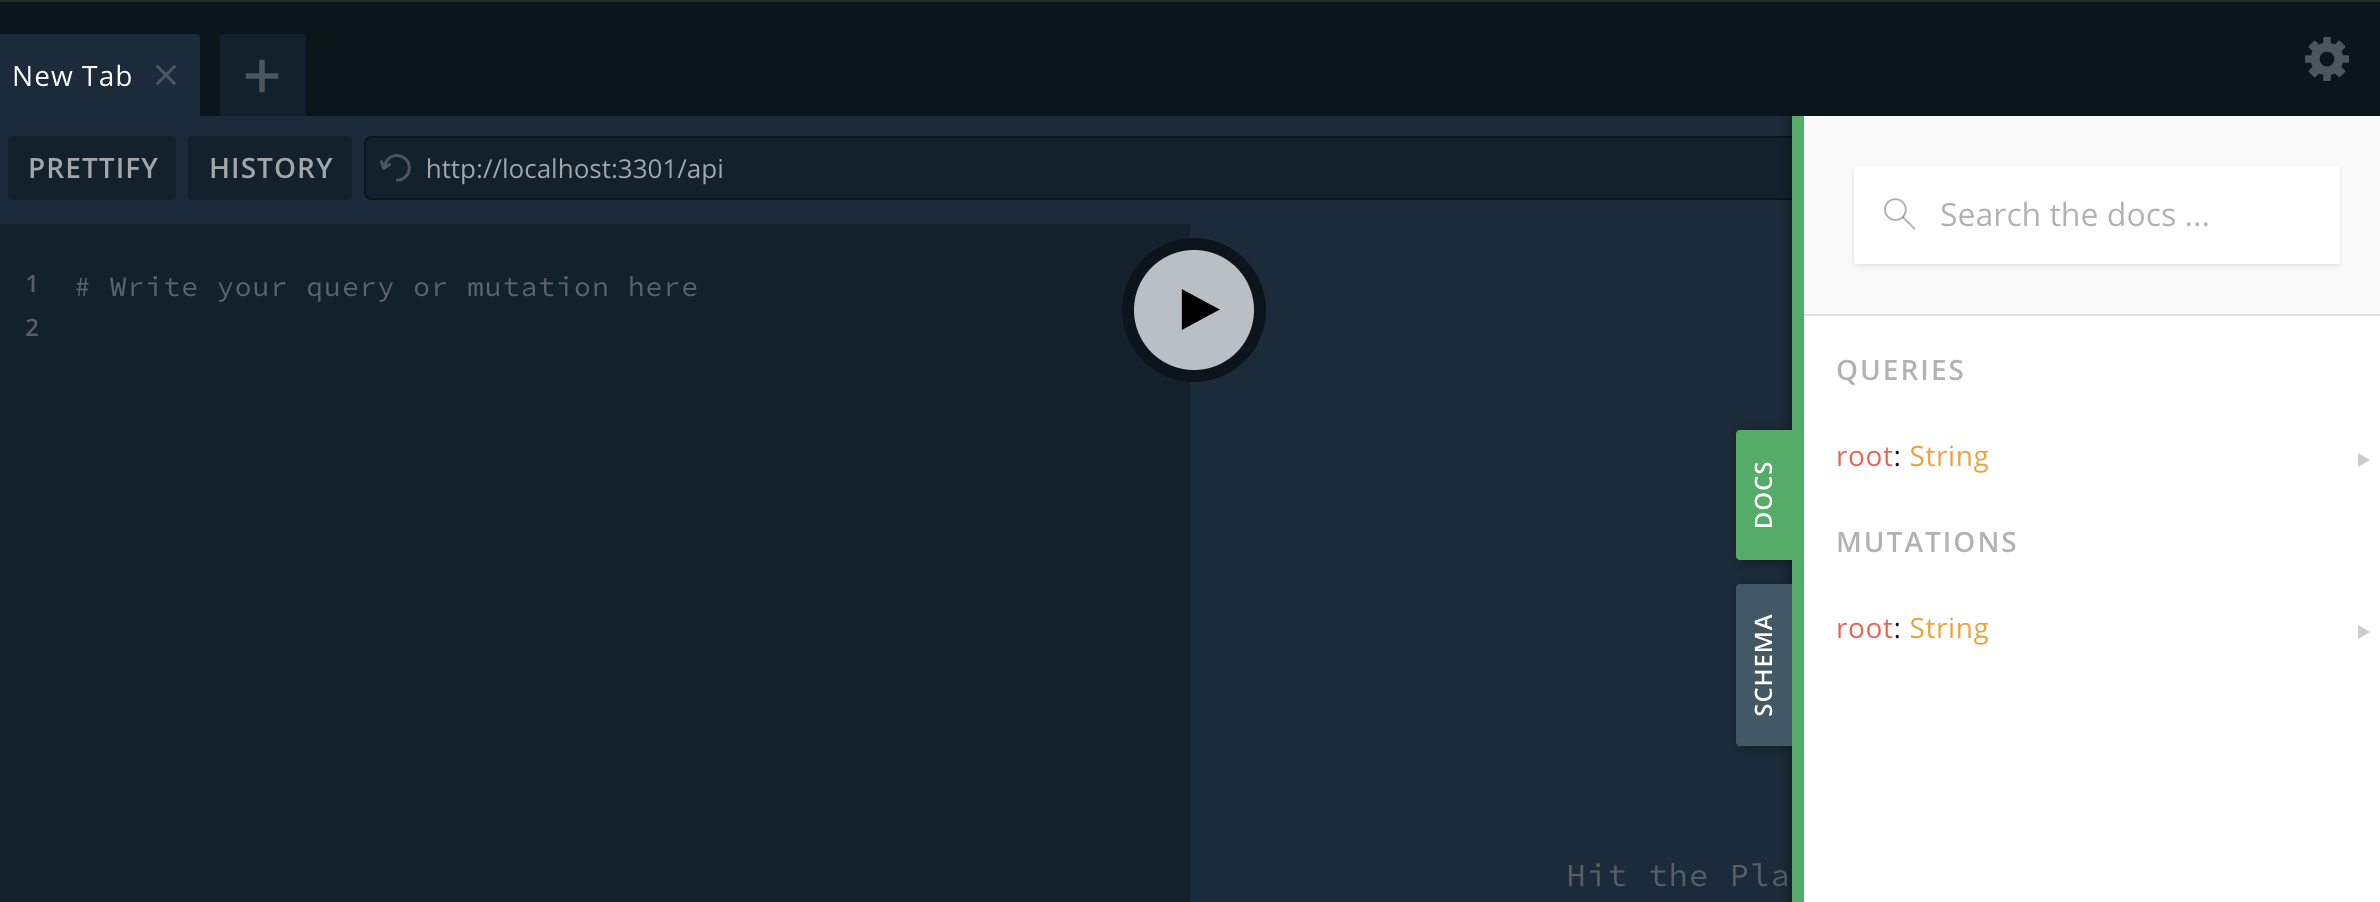
The playground is a GUI for testing the GraphQL API. It also contains the documentation and the schema for the API.
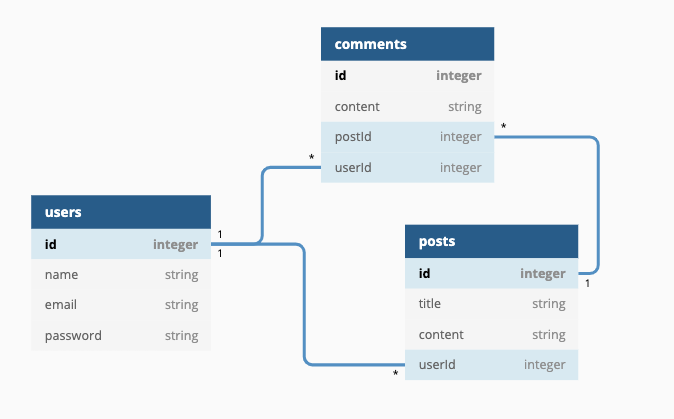
Create Database Migrations and Models using Sequelize
The database schema diagram is shown below:
If you are new to Sequelize, you could checkout this article on getting started with Sequelize
-
Create
.sequelizercfile$ touch .sequelizerc - Copy the code below into the
.sequelizercfile
// ./sequelizerc

const path = require('path');

module.exports = {
  "config": path.resolve('./database/config', 'config.js'),
  "models-path": path.resolve('./database/models'),
  "seeders-path": path.resolve('./database/seeders'),
  "migrations-path": path.resolve('./database/migrations')
};
Next up, run the command below:
$ npx sequelize-cli initThe command above will create a database folder containing the migrations, models, seeds, and config folders.
We need to make a few changes to the config/config.js and models/index.js files as follows.
// database/config/config.js

require('dotenv').config();

module.exports = {
  development: {
    username: 'root',
    password: null,
    database: 'database_development',
    host: '127.0.0.1',
    dialect: 'postgres',
    use_env_variable: 'DEV_DATABASE_URL',
  },
  test: {
    username: 'root',
    password: null,
    database: 'database_test',
    host: '127.0.0.1',
    dialect: 'postgres',
    host: '127.0.0.1',
    dialect: 'postgres',
    use_env_variable: 'TEST_DATABASE_URL',
  },
  production: {
    username: 'root',
    password: null,
    database: 'database_production',
    host: '127.0.0.1',
    dialect: 'postgres',
    host: '127.0.0.1',
    dialect: 'postgres',
    use_env_variable: 'DATABASE_URL',
  },
};
// database/models/index.js
require('dotenv').config();
const fs = require('fs');
const path = require('path');
const Sequelize = require('sequelize');
const basename = path.basename(__filename);
const env = process.env.NODE_ENV || 'development';
const config = require('../config/config')[env];
const db = {};
let sequelize;
if (config.use_env_variable) {
sequelize = new Sequelize(process.env[config.use_env_variable], config);
} else {
sequelize = new Sequelize(
config.database,
config.username,
config.password,
config,
);
}
fs.readdirSync(__dirname)
.filter((file) => (
file.indexOf('.') !== 0 && file !== basename && file.slice(-3) === '.js'
))
.forEach((file) => {
const model = sequelize.import(path.join(__dirname, file));
db[model.name] = model;
});
Object.keys(db).forEach((modelName) => {
if (db[modelName].associate) {
db[modelName].associate(db);
}
});
db.sequelize = sequelize;
db.Sequelize = Sequelize;
module.exports = db;Remember to replace the database name with your database name. If you are using postgres connection string, you could pass the env name of the connection string to use_env_variable.
Next run the command below to generate the migrations for the database schema:
$ npx sequelize-cli model:generate --name User --attributes name:string,email:string,password:string

$ npx sequelize-cli model:generate --name Post --attributes title:string,content:text,userId:integer

$ npx sequelize-cli model:generate --name Comment --attributes content:text,userId:integer,postId:integer
Let's add the foreign key constraints to the userId and postId in Posts and Comments migrations:
...
userId: {
        type: Sequelize.INTEGER,
        references: {
          model: {
            tableName: 'Users',
          },
          key: 'id',
        },
      },
...
...
postId: {
type: Sequelize.INTEGER,
references: {
model: {
tableName: 'Posts',
},
key: 'id',
},
},
...Next up, let's define the relationships between the models, edit the models as shown below:
// database/models/user.js


const bcrypt = require('bcryptjs');

module.exports = (sequelize, DataTypes) => {
  const User = sequelize.define(
    'User',
    {
      name: DataTypes.STRING,
      email: DataTypes.STRING,
      password: DataTypes.STRING,
    },
    {
      defaultScope: {
        rawAttributes: { exclude: ['password'] },
      },
    },
  );

  User.beforeCreate(async (user) => {
    user.password = await user.generatePasswordHash();
  });
  User.prototype.generatePasswordHash = function () {
    if (this.password) {
      return bcrypt.hash(this.password, 10);
    }
  };
  User.associate = function (models) {
    // associations can be defined here
    User.hasMany(models.Post, { foreignKey: 'userId', as: 'posts' });
  };
  return User;
};
Do you understand what's going on in the code snippet above?
- Defined the many-to-many relationship between
UserandPost. A user has many posts. - Added the
defaultScopeoptions to ensure that the password is not returned as part of the JSON result when the User model is queried. - Added
beforeCreatehook which automatically hashes the password using bcrypt.js under the hood
// database/models/post.js

module.exports = (sequelize, DataTypes) => {
  const Post = sequelize.define(
    'Post',
    {
      title: DataTypes.STRING,
      content: DataTypes.TEXT,
      userId: DataTypes.INTEGER,
    },
    {},
  );
  Post.associate = function (models) {
    // associations can be defined here
    Post.belongsTo(models.User, { foreignKey: 'userId', as: 'author' });
    Post.hasMany(models.Comment, { foreignKey: 'postId', as: 'comments' });
  };
  return Post;
};
// database/models/comment.js
module.exports = (sequelize, DataTypes) => {
const Comment = sequelize.define(
'Comment',
{
content: DataTypes.TEXT,
userId: DataTypes.INTEGER,
postId: DataTypes.INTEGER,
},
{},
);
Comment.associate = function (models) {
Comment.belongsTo(models.User, { foreignKey: 'userId', as: 'author' });
Comment.belongsTo(models.Post, { foreignKey: 'postId', as: 'post' });
};
return Comment;
};Now that we have defined the models relationships, we'll be able to use Sequelize mixins for example, post.getAuthor(), user.getPosts() etc.
If you've created the database and provided the config credentials, it's time to run migration:
$ npx sequelize-cli db:migrateCreate GraphQL Schema for User, Post, and Comment
User Schema
Create a file named user.js in the schemas folder and copy the code below into it:
// graphql/schema/user.js

const { gql } = require('apollo-server-express');

module.exports = gql`

 type User {
     id: Int!
     name: String!
     email: String!
     password: String!
     posts: [Post!]
 }

 extend type Mutation {
     register(input: RegisterInput!): RegisterResponse
     login(input: LoginInput!): LoginResponse
 }

 type RegisterResponse {
    id: Int!
    name: String!
    email: String!
 }

 input RegisterInput {
     name: String!
     email: String!
     password: String!
 }

input LoginInput {
     email: String!
     password: String!
 }

  type LoginResponse {
    id: Int!
    name: String!
    email: String!
    token: String!
 }
`;
What's going on in the snippet above?
- We created a
typeUser, and made all the fields required using the bang! - In the User type, we added a field
postswhich returns type Post, this makes it possible for us to query the posts created by a user [Post!]means that it's okay for a user not to have a post, but if she/he does have, it must be of type Post- We defined two mutations, register, and login, these serve as the register and login endpoints respectively
Post Schema
Create post.js file in schemas and copy the code below into it:
// graphql/schemas/post.js

const { gql } = require('apollo-server-express');

module.exports = gql`

 type Post {
     id: Int!
     title: String!
     content: String!
     author: User!
     comments: [Comment!]
     createdAt: String

 }

extend type Query {
    getAllPosts: [Post!]
    getSinglePost(postId: Int!): Post
}

 extend type Mutation {
     createPost(title: String!, content: String!): CreatePostResponse
 }

 type CreatePostResponse {
    id: Int!
    title: String!
    content: String!
    createdAt: String!
 }

`;
Again, we created type Post. This time we added two queries for fetching all posts and a single post and another mutation for creating a new post.
Comment Schema
Create comment.js file in schemas and copy the code below into it:
// graphql/schemas/comment.js

const { gql } = require('apollo-server-express');

module.exports = gql`

 type Comment {
     id: Int!
     content: String!
     author: User!
     post: Post!
     createdAt: String

 }

 extend type Mutation {
     createComment(content: String!, postId: Int!): CreateCommentResponse
 }

 type CreateCommentResponse {
    id: Int!
    content: String!
    createdAt: String!
 }

`;
Notice that the Comment type has post and author which return type Post and User respectively.
Lastly, let's update the root schema, update the schemas/index.js as shown below:
// graphql/schemas/index.js

const { gql } = require('apollo-server-express');
const userType = require('./user')
const postType = require('./post')
const commentType = require('./comment')

const rootType = gql`
 type Query {
     root: String
 }
 type Mutation {
     root: String
 }

`;

module.exports = [rootType, userType, postType, commentType];
Next up, we will create the resolvers for the schemas.
Create Resolvers
First off, let's look at the structure of a resolver function.
 register(root, args, context, info) {

}
The above snippet defines a resolver named register. A resolver function takes four arguments:
- root: This is the result of the parent resolver. We'll see the application later.
- args: The arguments or data provided by the graphQL query. This can be seen as the request payload in REST API.
- context: An object available to all resolvers. Any data that should be globally accessible to all resolvers are placed in the context. For example, we can pass the Sequelize models to the context.
- info: An object which contains specific information to the correct query. This is only useful is advanced cases.
Now that we have understood what a resolver is, let us create the resolvers for User schema.
User Resolver
Let us create resolvers for register and login mutations in the User schema. Create a new file user.js in the resolvers folder and copy the following code into it:
// graphql/resolvers/user.js
const jwt = require('jsonwebtoken');
const bcrypt = require('bcryptjs');
const { AuthenticationError } = require('apollo-server-express');
const { User } = require('../../database/models');
module.exports = {
Mutation: {
async register(root, args, context) {
const { name, email, password } = args.input;
return User.create({ name, email, password });
},
async login(root, { input }, context) {
const { email, password } = input;
const user = await User.findOne({ where: { email } });
if (user && bcrypt.compareSync(password, user.password)) {
const token = jwt.sign({ id: user.id }, 'mySecret');
return { ...user.toJSON(), token };
}
throw new AuthenticationError('Invalid credentials');
},
},
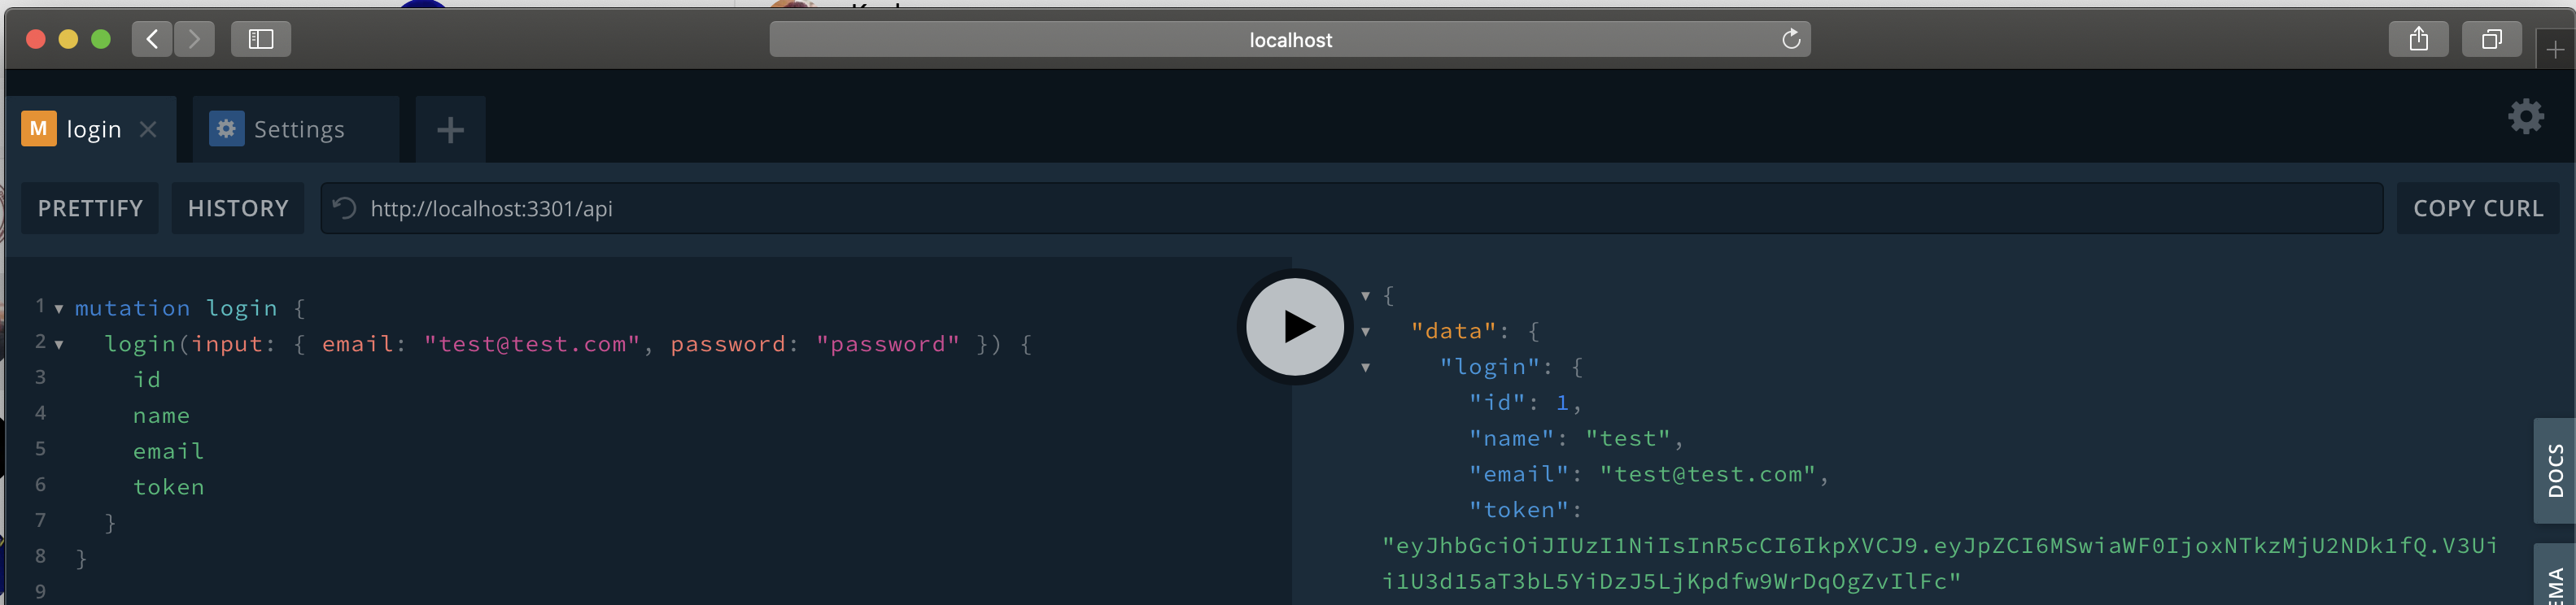
};In the register resolver, we extracted the payload from the args object and created the new user using the User model. In the login, we authenticate the user and return the user alongside a JSON web token if the correct credentials are provided else an Authentication error is thrown.
Note: The snippet above is for demo purposes and not advisable to be used in production. In a real application, you'd want to validate the inputs, store the JWT secret in the .env, and observe other security best practices.
Now, when you test the mutations (endpoints) on the playground, you'll get similar results as shown in the screenshots below:
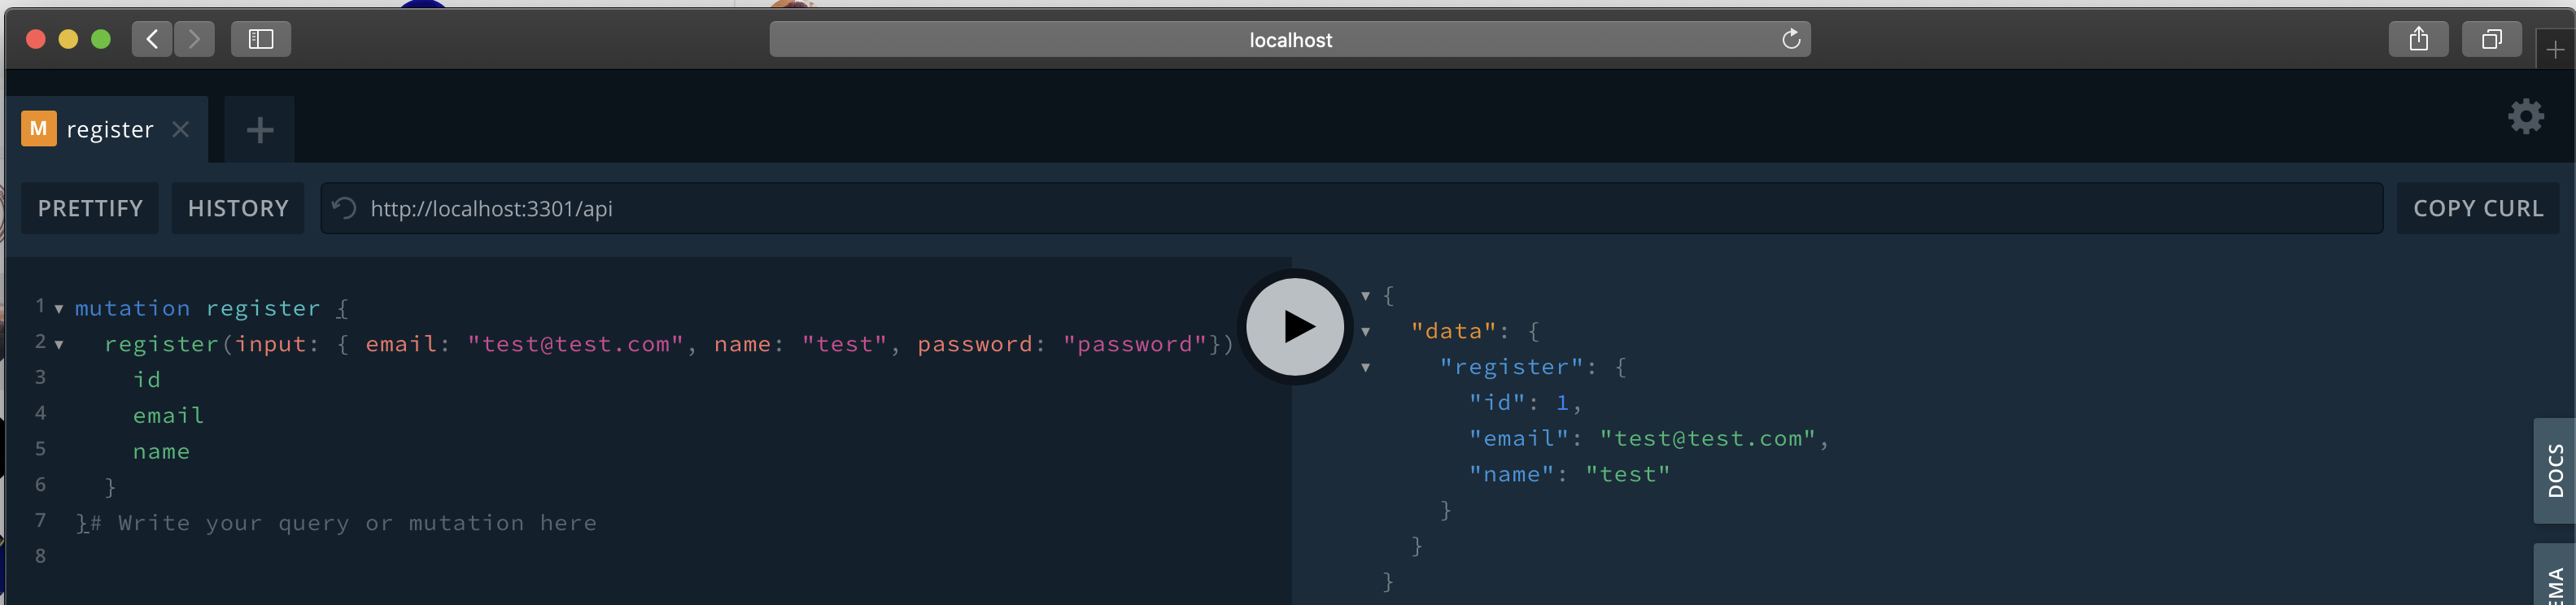
The graphQL query for the screenshots above can be found in query.graphql included in the article repository.
Request Authentication
Before we create the Post resolvers, we need to device a means of authenticating the requests. We want to add a function that checks if the request headers contain an authorization token.
Edit the graphql/context/index.js as follows:
// graphql/context/index.js

const { User } = require('../../database/models');
const jwt = require('jsonwebtoken');
const { AuthenticationError } = require('apollo-server-express')

const verifyToken = async (token) => {
  try {
    if (!token) return null;
    const { id } = await jwt.verify(token, 'mySecret');
    const user = await User.findByPk(id);
    return user;
  } catch (error) {
    throw new AuthenticationError(error.message);
  }
};

module.exports = async ({ req }) => {
  const token = (req.headers && req.headers.authorization) || '';
   const user = await verifyToken(token)
  return { user };
};
Looking at the snippet above, we created a helper function verifyToken which verifies the token and returns the user whose id is encoded in the token. In the context function, we checked for the authorization in the request headers, if there's a token, we decode it, and pass the user object to the context. Now, we can check for the user object in the context to determine if the request is authenticated.
Post Resolver
First, let's create the createPost resolver. Create a new file post.js in graphql/resolvers and copy the code below into it:
// graphql/resolvers/post.js

const { Post } = require('../../database/models');

const { AuthenticationError } = require('apollo-server-express');

module.exports = {
  Mutation: {
    async createPost(_, { content, title }, { user = null }) {
      if (!user) {
        throw new AuthenticationError('You must login to create a post');
      }
      return Post.create({
        userId: user.id,
        content,
        title,
      });
    },
  },
};
We destructured the args object to get the content and title from the request. Likewise, we destructured the context to get the request user, if user is null it means the request is not authenticated. The screenshot below shows the result when tested on the playground.
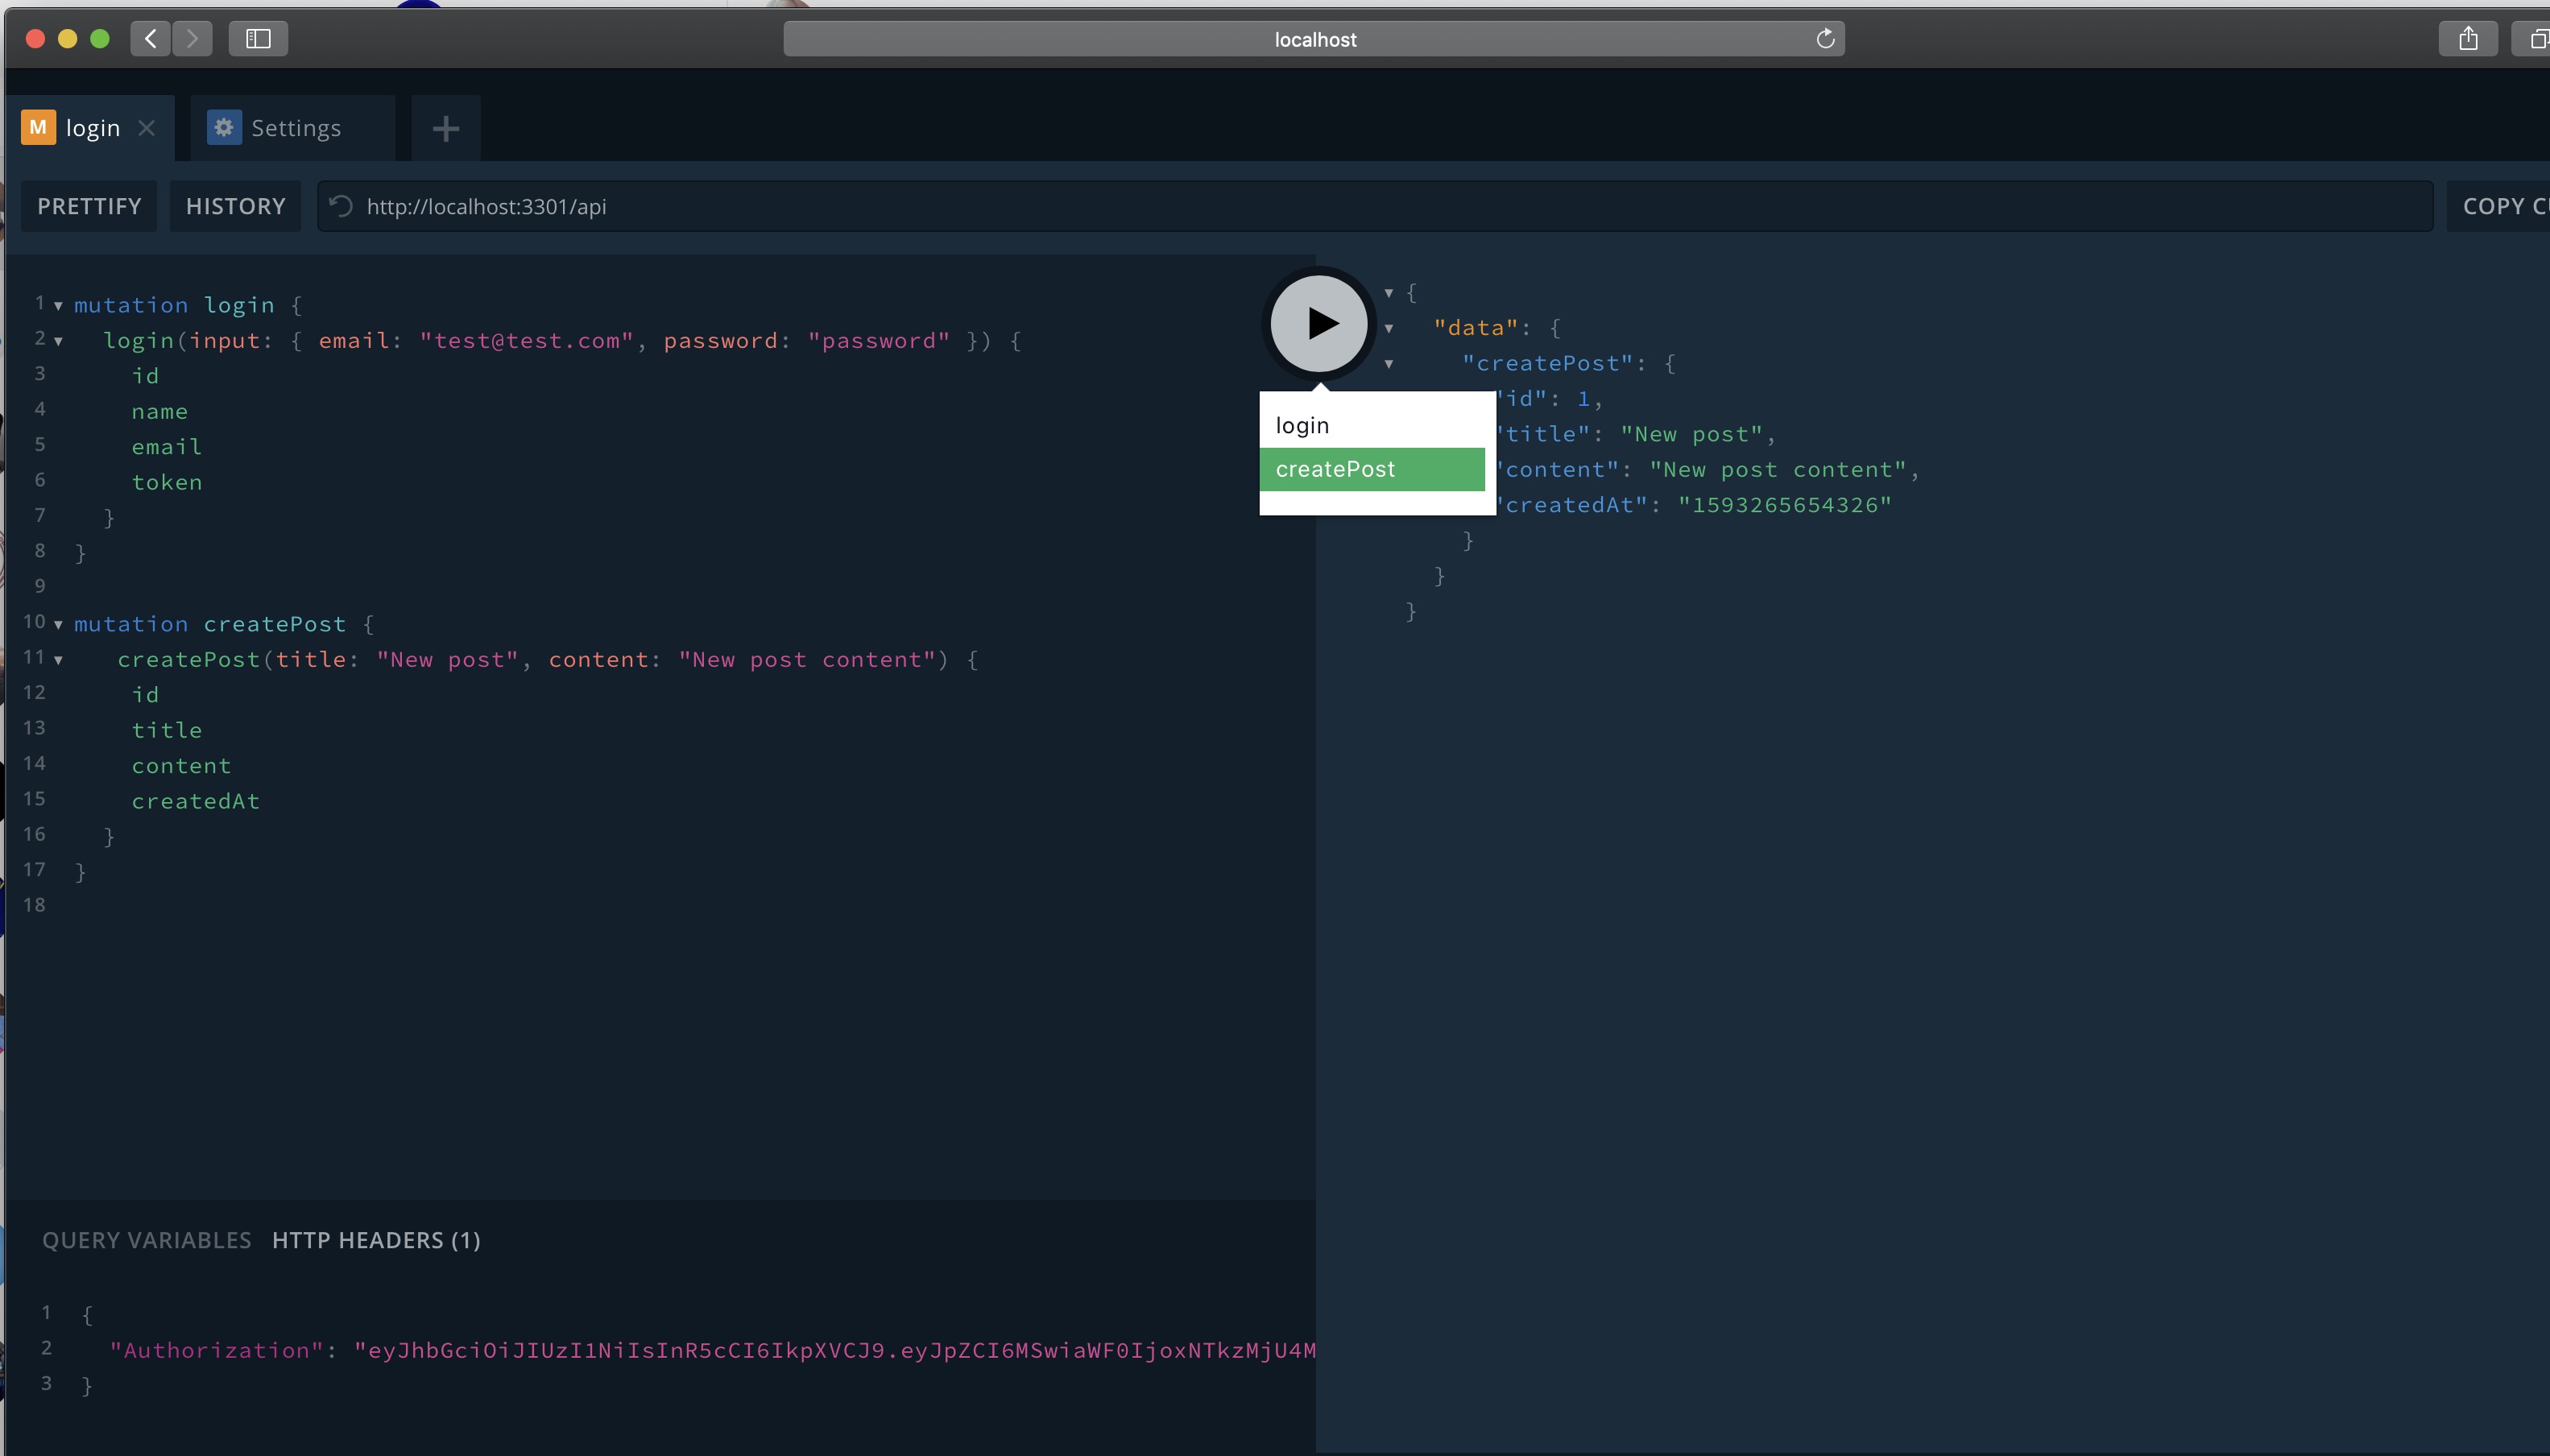 Looking closely at the screenshot above, you'll see how the authorization was added. To add authorization header in the graphQL playground, go to the bottom of the playground, click the
 HTTP HEADERS and add the authorizations as shown below:
{
  "Authorization": "your-json-web-token"
}
You can get the token via the login mutation we created earlier.
Next up, let's create resolvers for getAllPosts and getSinglePost. Edit the post.js as follows:
// graphql/resolvers/post.js

const { Post } = require('../../database/models');

const { AuthenticationError } = require('apollo-server-express');

module.exports = {
  Mutation: {
    async createPost(_, { content, title }, { user = null }) {
      if (!user) {
        throw new AuthenticationError('You must login to create a post');
      }
      return Post.create({
        userId: user.id,
        content,
        title,
      });
    },
  },

  Query: {
    async getAllPosts(root, args, context) {
      return Post.findAll();
    },
    async getSinglePost(_, { postId }, context) {
      return Post.findByPk(postId);
    },
  },

  Post: {
    author(post) {
      return post.getAuthor();
    },

    comments(post) {
      return post.getComments();
    },
  },
};
Notice that we added a resolver for Post itself, in the Post schema we have author and comments. Here we made use of the root object which is post in this case. GraphQL implicitly resolves the Post to the result of the Post query passing the post object as the root object. We then made use of Sequelize mixin to return the related author and comments for the Post.
Let's test the getAllPosts query. You can add the sample query below on the playground.
query allPosts {
  getAllPosts {
    id
    title
    content
    author {
      id
      name
    }
    comments {
      id
      content
    }
  }
}
The response of the query above is shown below:
{
  "data": {
    "getAllPosts": [
      {
        "id": 1,
        "title": "New post",
        "content": "New post content",
        "author": {
          "id": 1,
          "name": "test"
        },
        "comments": []
      }
    ]
  }
}
Looking at the response, the query returned the single post in the database alongside the author of the post, and an empty array for comments since the post has no comments yet.
In the same manner, the query below shows how we can query for a single post.
query singlePost {
  getSinglePost(postId: 1) {
    id
    title
    content
    author {
      name
    }
  }
}
It's up to you to define your query according to your need.
Comment Resolver
In the Comment schema, we have a createComment mutation, let's create a resolver for it.
Copy the snippet below into graphql/resolvers/comment.js:
// graphql/resolvers/comment.js

const { Post } = require('../../database/models');

const { AuthenticationError, ApolloError } = require('apollo-server-express');

module.exports = {
  Mutation: {
    async createComment(_, { content, postId }, { user = null }) {
      if (!user) {
        throw new AuthenticationError('You must login to create a comment');
      }

      const post = await Post.findByPk(postId);

      if (post) {
        return post.createComment({ content, userId: user.id });
      }
      throw new ApolloError('Unable to create a comment');
    },
  },

  Comment: {
    author(comment) {
      return comment.getAuthor();
    },
    post(comment) {
      return comment.getPost();
    },
  },
};
Similar to the post resolver, we ensured that only authenticated users can create a comment, and also we ensured that the post exists by first retrieving the post and then using the relationship method provided by Sequelize to create a comment for the given post.
A sample query to create a comment is shown below, copy and paste it on the playground to test the mutation. Remember to add the auth token in the authorization header.
mutation createComment {
   createComment(content: "New post comment", postId: 1) {
    id
    content
    createdAt
  }
}
And the response is as shown below:
{
  "data": {
    "createComment": {
      "id": 5,
      "content": "New post comment",
      "createdAt": "1593345238316"
    }
  }
}
Now, when you query Post, you'll be able to get results for the post's comments.
Remember to import the resolvers to the root resolver graphql/resolvers/index.js. It should now look like shown below:
// graphql/resolvers/index.js

const userResolvers = require('./user');
const postResolvers = require('./post');
const commentResolvers = require('./comment');

module.exports = [userResolvers, postResolvers, commentResolvers];
That is it! We've built a simple GraphQL API.
Conclusion
If you followed up to this point, you'd have successfully developed an API using graphQL. It's worthy to note that this article uses a minimalistic approach focusing on the most important things rather than best practices. We used PostgreSQL and Sequelize ORM as the data source, it could be anything that suits your application.
What next?
In the next articles, I will be writing on how to improve your application using middleware, how to implement integration testing on your graphQL API etc, stay tuned!